win10下VSCode+CMake+Clang+GCC环境搭建教程图解
(编辑:jimmy 日期: 2026/1/24 浏览:2)
打算用C/C++把基本的数据结构与算法实现一遍, 为考研做准备, 因为只是想实现算法和数据结构, 就不太想用VisualStudio, 感觉VSCode不错, 遂在网上找了一些教程, 结合自己的需求, 配置一下开发环境.
安装软件
CMake
CMake是一个跨平台的自动化建构系统,它使用一个名为 CMakeLists.txt 的文件来描述构建过程;
官网下载安装, 傻瓜式操作;
记得把安装目录下的bin文件添加到系统环境变量, 这个可以在安装的时候勾选, 勾选了就不用自己添加了;
检测是否安装成功:
MinGW
MinGW即Minimalist GNU For Windows,是将GNU开发工具移植到Win32平台下的产物,是一套Windows上的GNU工具集。简单说,MinGW是一个编译环境; 相当于linux下的GCC;
官网下载链接;
安装好将安装目录下的bin文件夹的路径添加到环境变量:
Clang
类似GCC的编译器, 它的目标是干死GCC(网上看到别人这么说的).
维基百科:
Clang(发音为/"external nofollow" href="http://releases.llvm.org/download.html">官网下载
傻瓜式安装, 安装好把安装目录下的bin文件夹的路径添加到环境变量;
安装VSCode插件
如图, 安装好图中的插件:
新建文件夹, 开始撸代码
main.cpp
#include <iostream>

using namespace std;

int main(int argc, char* argv[])
{
 int a = 89;
 int b = a++;
 char buf[10] ;
 cout << "a = " << a << endl;
 cout << "b = " << b << endl;
 cout << "Hello...";
 cin.get(); //防止闪屏
 return 0;
}
CMakeList.txt
cmake_minimum_required(VERSION 3.11)

project(VSCode_Cpp_CMake)
# 代码路径
aux_source_directory(. DIR_TOOT_SRCS)
# debug 模式
set (CMAKE_CXX_FLAGS "${CMAKE_CXX_FLAGS} -g")
# 生成可执行的文件
add_executable(VSCode_Cpp_CMake ${DIR_TOOT_SRCS})
配置 c_cpp_properties.json
键盘按下: ctrl+shift+p
{
 "configurations": [
  {
   "name": "CMake",
   "includePath": [
    "${workspaceFolder}/**"
   ],
   "defines": [
    "_DEBUG",
    "UNICODE",
    "_UNICODE"
   ],
   "windowsSdkVersion": "10.0.18362.0",
   "compilerPath": "C:/MinGW/bin/g++.exe", // 根据自己的安装目录确定
   "cStandard": "c11",
   "cppStandard": "c++17",
   "intelliSenseMode": "clang-x64", // 注意修改, 提供智能提示
   "configurationProvider": "vector-of-bool.cmake-tools"
  }
 ],
 "version": 4
}
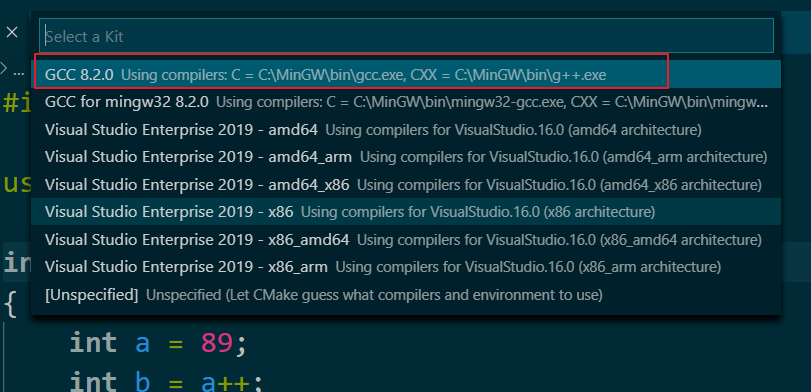
配置CMake
按快捷键: ctrl+shift+p
按下图操作:
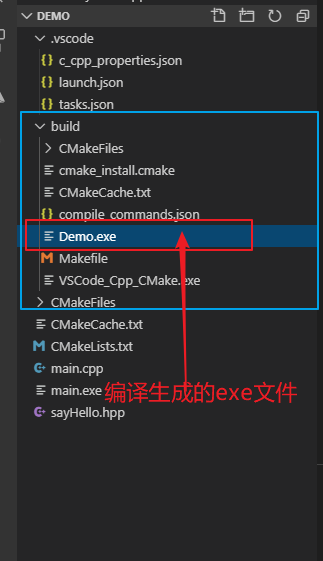
这里操作好就可以进行编译生成exe文件了:
配置调试文件 launch.json 和 task.json
使用gdb进行调试.
快捷键: F5 -> C++ (GDB/LLDB) -> g++.exe build and debug actvive file
vscode 会自动生成一个默认的 launch.json 和 task.json
编辑launch.json和task.json, 注意加了注释的地方都是要修改的;
task.json
{
 "tasks": [
  {
   "type": "shell",
   "label": "cmake build active file", // 任务名称
   "command": "cmake --build ${workspaceFolder}\\build --config Debug --target all -- -j 10", // cmake指令
   "args": [
   ], // 指令参数
   "options": {
    "cwd": "C:/MinGW/bin"
   }
  }
 ],
 "version": "2.0.0"
}
launch.json
{
 // Use IntelliSense to learn about possible attributes.
 // Hover to view descriptions of existing attributes.
 // For more information, visit: https://go.microsoft.com/fwlink/"version": "0.2.0",
 "configurations": [
  {
   "name": "(gdb) Launch", // default: g++.exe build and debug active file
   "type": "cppdbg",
   "request": "launch",
   "program": "${workspaceFolder}\\build\\Demo.exe", // 可执行文件所在的路径, Demo= 替换成自己的项
   "args": [],
   "stopAtEntry": false,
   "cwd": "${workspaceFolder}",
   "environment": [],
   "externalConsole": true, // 显示独立控制台窗口
   "MIMode": "gdb",
   "miDebuggerPath": "C:\\MinGW\\bin\\gdb.exe",
   "setupCommands": [
    {
     "description": "Enable pretty-printing for gdb",
     "text": "-enable-pretty-printing",
     "ignoreFailures": true
    }
   ],
   "preLaunchTask": "cmake build active file" // 执行cmake编译任务, 再task.json中定义的
  }
 ]
}
编译和调试
编译 快捷键: F7
调试 快捷键: F5
总结
以上所述是小编给大家介绍的win10下VSCode+CMake+Clang+GCC环境搭建教程图解,希望对大家有所帮助,如果大家有任何疑问欢迎给我留言,小编会及时回复大家的@


